Blog Archive

Mint sauce with that??


Having a look around the garden after we returned from holidays, it was easy to see that the mint had enjoyed the copious amounts of sunshine and rain (more rain) that the garden had enjoyed this past week.

Time to make another batch of mint sauce then!

We go through so much mint sauce in our household, as whilst I only put it on new potatoes and peas (being vegetarian I don't eat any lamb to put it on) POH puts it on just about everything. Although you can busy some pretty decent commercial sauce, nothing beats the taste of the homemade variety when, in the depths of a bleak, dark winter, it provides a sunny taste of the freshness of the garden, and the promise of things to come.

Plus, it is so easy-peasy to make, it is well worth making some (and the house smells gorgeous for hours afterwards too!)

If you have some homegrown mint, or a neighbour or friend is growing it and is willing to donate some, here's how to get started:

Firstly, this recipe is for about 3oz of prepared mint leaves, which doesn't sound a lot, but on the stalks is almost a carrier bag full!  If you don't have that much mint you can adjust the quantities accordingly.

Ingredients:

3oz prepared mint leaves (see note above)
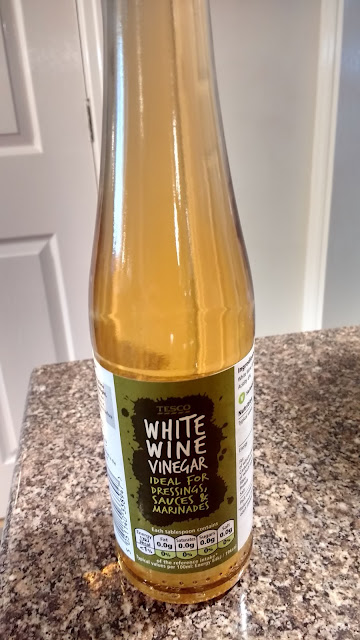
1/2 pint of white wine vinegar.  (You can also use cider vinegar if you prefer that.)
2 1/2 oz of white sugar.  (You can always add more sugar when you serve it, but I don't like overly sweet mint sauce.)

Method:

Strip the leaves from the stalks.  Wash thoroughly, and then dry it really well.  If you have a salad spinner this is ideal.  If not, clean tea towels work well.


Now you need to chop the mint.  If you are feeling determined you can you use a large knife and a chopping board.  Me?  Food processor every time!  Just be careful not to over process it, as it very quickly turns to mush, and part of the beauty of home made mint sauce is that it has texture.


Weigh your mint, so you know how much vinegar you will need.

You will also need 2 or 3 clean and sterilised jars.  To sterilise, wash jars and lids thoroughly and place the jars, still wet, in a warm oven (about 120 Celsius) for about 15 minutes, until they are completely dry.

To sterilise lids, place them in a jug of boiling water for a few minutes and leave until ready to seal the jars.


Place the white wine vinegar and sugar in a pan and heat gently to disolve sugar and then bring to a boil and turn off the heat.  NOTE: 


Now you need to work fairly quickly, but protect your hands as everything is going to be hot!

Place the hot jars on a wooden board and spoon in the chopped mint.  You are aiming for a full jar, lightly packing the mint down. Leave half a inch head space.  

Then, pour the hot vinegar into the jars.  Using a table or butter knife, run the blade around the inside of the jar to release any air bubbles.

Wipe the top of the jars with a clean cloth to remove any stickiness, then carefully remove the lids from the water, dry them, and seal the jars.

As the jars cool you should hear a reassuring 'pop', which means the jar is sealed and can be stored in the cupboard.  The centre of the lid should also pop inwards and not move when you press it.

If any of the jars haven't sealed, pop them in the fridge and use them up first.

To serve, spoon some into a small dish and add a little extra white wine or cider vinegar.  Delicious!


You don't have to put little fabric hats on your jars, but they do look pretty when you open the cupboard door!

How did yours turn out? Post a comment below!

Donna x

A Scottish Adventure


Last week we drove up to the West Coast of Scotland for a week's holiday.  I had not been to this part of the country before, so wasn't entirely sure what to expect, but I certainly wasn't disappointed! The landscape was spectacular and it was a case of scenery overload!  Around every corner there seemed to be something fabulous to see. From Lochs to sea, castles to mountains, boats to gardens, waterfalls to canals, this holiday had it all.

We stayed in a lovely little cottage on the Crinan Canal.  It was so pretty!  The canal had a series of, I think, 18 locks, and we loved watching yachts and other boats trundling up and down.  

The Crinan Canal was built to enable goods to be moved up country, avoiding the treacherous Mull of Kintyre.  Nowadays it is just used for pleasure cruising, walking, and wildlife watching.  


You can't go to this part of Scotland without having an encounter on a ferry or two, so we did two - Arran and Gigha.

The ferries run a super efficient and very friendly service.  We waited in neat little painted boxes at the ferry terminal and watched our ferry to Arran emerging from the mist.


Arran was beautiful!  We drove the whole way around the island, stopping off to take a closer look at anything that took our eye.  We had a lovely picnic on this bench.  Perfect!


One of the highlights of the week for me was a visit to Inveraray Castle.  As you may by now know, I am rather partial to Downton Abbey and Inveraray Castle appeared as 'Duneagle', so I just had to have a look!

Wow.


The Crawleys departed via these steps, having arranged for Lady Rose to live with them whilst her parents were in India.


The dining room was used in the programme and what a dining room and a half it is!


Anna and Mr Bates discovered Lady Rose smoking here and gave her a mint to hide the fact from her unpleasant Mother!


Tearing myself away from Downton, let's get back to that spectacular scenery!


Lastly, we spotted this gorgeous butterfly having a rest.  Isn't nature just amazing?


It was a fabulous week and we certainly plan to go back.  

Back home again, and the washing is all done, the garden is (sort of) tidied and the fridge is restocked.  It's lovely to travel but it's great to be Home.

Donna x 

A Blooming Big Blanket

Last autumn I went to Yarndale for the first time, (oh, what bliss!) and that was also the first time I met Lucy, from Attic24, in person. What a joy and a delight, and I happy to say that I now spend happy hours at Cooper's Creative in the company of Lucy, Tracy (Patchwork Chickens) and many other wonderful bloggers and creative ladies that I am so happy, and lucky, to call friends.

Anyway, I digress (nothing new there, then!)

I bought an Attic24 Cosy Stripe blanket kit at Yarndale, (which is now made and in regular use in our living room), and also mentioned to Lucy that I wanted to make a giant ripple blanket for our bed.  She was kind enough to let me call into her studio in Cooper's and use her blanket planning pegs to choose the colours. I happened to have brought with me to Yarndale a cushion cover from our bedroom, (super organised, eh?) so that I could match the wallpaper and fabric.

It's a Laura Ashley fabric, now discontinued, but I think it was called Peony Garden, and the colour is Amethyst.

I wanted to keep a simple colour palette, as the wallpaper (just on one wall though) and fabric is so busy, therefore I just picked 4 colours - Grape, Pale Pink, Grey and Silver, from the range of Stylecraft Special DK.


I wanted to have Grape as the prominent colour, as that is the main colour of the bedroom, so my stripes are 12 rows of Grape, 6 rows of Pale Pink,  2 rows of Grey and 1 row of Silver.  

I am using Lucy's excellent Neat Ripple Pattern.  I wanted my finished blanket to be 7' wide - the width of the bed (5') plus 1' overhang on each side.  I made a starting chain of 423, giving a working width of 420 stitches.  Oh boy.  I didn't quite appreciate how massive each stripe would seem to crochet!

1 x 100g ball gives me 7 rows.  My Lovely Son (LS) bought the yarn for my birthday last October, and I vowed to have it finished by my next birthday.  Seemed like ages at time, however, October will be here before I know it and it's still not finished! It's the sort of project that I work on like mad for several days, and then have a break.  By late spring it seemed to be getting a bit hard going, but then one day, at Cooper's, Tracy and I decided to each work 1 row per day on our respective blankets, with the aim of having them finished by the time chilly autumn nights arrived. That really kick-started it and I am pleased to say I only have 34 rows left to do, plus the edging!  The end is in sight.  WooHoo!!

I laid the blanket out, just to have a little admire:


I am so ridiculously pleased with how it is looking.  I love the narrow bands of grey and silver - sort of ric rac like.  It is also so, so soft and very drapey.  I am  using a 4mm hook, which is giving me just the right balance of density and drapiness.  (Spell-check has gone crazy on this paragraph, as I seem to be inventing words now!)

The other evening POH and I were watching a film, and, as it got to the good bit, I put the Blooming Big Blanket down in order to concentrate. A little while later I looked down to see that Daisy Dog had managed to drag a corner of BBB into her basket and was cuddled up with it, sound asleep.  I think it has definitely passed the Snuggle Test...


I now can't wait to finish it, and spread it upon the bed.  Only a few tens of thousand stitches to go.  :D

Donna x 

Happy Summer Days

Well, we've had slightly less rain, and definitely more sun! Consequently, I've done less sewing than in recent weeks and a bit more crochet, as I can sit outside and do that.  I'm still enjoying working on my granny stripe 'A Good Vintage Cardigan', that I talked about on my last post.  The soothing stripes in jolly colours are perfect for summer afternoon crochet.  

We've also been pottering in the garden, although the ground is rather too muddy to do much.  The runner beans are growing like mad now!

Sunny days have resulted in a couple of picnics being hastily arranged.  I love (I mean really LOVE) picnics, and the simple pleasure of spreading out the picnic tablecloth, or even a napkin on a bench, brings all sorts of happiness to my heart.


This was Tuesday - a lovely day spent with my dear friend, J, at...of course...Dunham Massey!  Yes, my happy place!  J and I sat in the formal gardens and chatted and ate and chatted some more.  You will note the absence of cake or dessert in the above photo, that's because we went to the cafe and stuffed ourselves full of cream scones and bara brith afterwards :)

I must just say (brag) that all the salad in the blue container was homegrown.  Every last leaf and cucumber slice was grown in our garden.  


It was such a lovely day.  The sun was shining and we enjoyed watching the deer enjoying the sunshine too.


I could live here (in my dreams!)


I did manage a little bit of sewing last week, on a rainy afternoon.  I made myself a skirt, modified from Vogue 8749.  I didn't like the centre front seam, so I removed that by cutting the front on the fold. I put a concealed zip in the side seam.  

I saw the fabric in Cool Crafting in Skipton, half price, so I could hardly leave it there, could I??  I have also been looking for a good excuse to buy some giant ric rac, and if you can see, the flowers have a sort of zig zag applique detail to them, so I thought this could be my chance!

The cotton fabric was a dream to sew, and with only two main pieces, plus waist facing, it was literally a couple of hours of sewing.  It's a full circle, so a little bit retro, I thought.


In the week since I made it I've worn it three times, and it is cool and comfortable, and deliciously flippy!

I've made this pattern a couple of times before, and always forget how much I enjoy sewing it.  The longest part is definitely pressing up the hem, but I do that in a more simple way than the pattern suggests by either overlocking the edge and then pressing up a scant 1/2", or, if  the fabric is very lightweight, such as a lawn, I press up 1/2" and then go around again, tucking the edge under to meet the fold, giving it a good press as I go, This results in a very neat 1/4" narrow hem. Doing it this way eliminates the need for easing/steaming/coaxing into submission the fullness of a full skirt.  
On a cotton, summer skirt like this, I usually machine stitch the hem, but on a wool skirt, or 'best dress' I would invisibly slip stitch the hem.  A couple of years ago I made a full length ball gown for my daughter in red embroidered satin brocade.  The hem was over 6 metres wide, finished with 'horsehair' braid on the inside to make it 'float'.  I hand stitched the entire hem with teeny tiny stitches. 

Now that, dear reader, is Love.

Donna x 


Summer days

This should be a post about lazy afternoons in the garden, picnics, al fresco crochet, and so on, but the truth is it has rained.  And rained.  And rained some more.  I don't remember as much rain as this in a six week summer holiday. May and June were, for the most part, very warm and dry.  Positively too hot at times!  I even remember bemoaning the fact that it took so long hauling countless watering  cans down to the vegetable garden every day, as rain was so scarce.  Ha!  Not any more.  Rain aplenty!

The good news is (and there is, I think, in life, pretty much always some good news) the vegetables are growing like mad.  We have soooo many courgettes, beans, peas, pea shoots, lettuce, chard and kale, dinner time is just a case of taking down a large colander and filling it up with fresh and tasty produce.

The rain has also meant more time for sewing and crochet projects this past week.  Having finished the shirt marathon, I kept the promise to myself of making something quick and easy and I made a dress for myself.


This (McCalls 7313) is a super fast pattern, that I have made several times before, and can literally be run up in an afternoon.  I have one regret with this particular dress though.  The others I have made have been in heavyish cotton or wool knit fabrics (the pattern is designed for knits) and after a few washes they have all stretched and the hems have 'dropped' along the bias (even after I have hung hem on Valerie for a few days before hemming).  Also, the waistline has dropped, and a couple I have had to take up at the waist.  This time I bought a lightweight synthetic knit, thinking I would avoid these problems, and I also removed the 1" I always add to the bodice length to compensate for my height.  

Probably because the fabric is so light, the waist is now too high! I removed the elastic stay from the waistline, as it was riding up and driving me mad, and that has improved it a lot, but I still think it looks a little high.  POH says it looks fine, so it's probably not as bad as I think it is.


I don't normally use synthetic fabrics, as I feel the heat quite a bit, but this should be a nice rinse-it-out-and-wear-it-again dress for holidays.  


I didn't know POH was taking this photo. with Daisy photobombing...

Every year I grow sweet peas, from seed, for my friend, C, and myself.  It's become a real tradition, and C looks forward to the day I take her a box of little seedlings to nurture and talk to and eventually pick the blooms. I always sow some of the seeds on Mother's Day, in both of our Mother's Memories.

This year I grew two types - 'Royal Family' and an unnamed trial variety from Thompson and Morgan.  Both have done exceptionally well and the scent from the vase of sweet peas we have permanently on our dining table fills the whole room with the most delicious and intoxicating fragrance.


I've been a bit naughty and started a new project, despite having 2 blankets and one cardigan on the go already.  The existing cardigan has been named Sludge, as it is not the most colourful wool ever.  I bought it online and it was called 'Almond', which sounded nice.  I have never seen an almond this colour though...  I don't have a photo to show you, as it's not very photogenic, but I promise to take a photo when it's completed.  I've finished the actual crochet, and it just needs sewing together and edging.  The lovely ladies at Cooper's Creative said it would be nice in the autumn with maybe a burgundy, or navy blue, dress or top.  They are very kind.

So, I travelled from Sludge to rainbow tutti-frutti!  


I'm so excited to have actually started 'a good vintage cardigan', a pattern by Fran Morgan that I bought on Ravelry.  It  is basically granny stripes, and so simple to make.  You change colour every row, so there are a lot of ends to sew in, but having listened to, and heeded the advice of Lucy from Attic24, I am sewing them in every 6 rows or so. I feel quite 

I couldn't get all the colours in the King Cole Merino the pattern specified, so bought Drops Baby Merino 4 ply instead.  Such a soft and squidgy wool!  I matched most of the colours pretty well from their range, but have a lemon instead of the mustard.  I think it is looking fab! No Sludge here!


This was at Cooper's, Skipton, last Friday.  Mmmmm, almond croissant....

We did manage one afternoon tea in the garden recently, and very nice it was too :)


Let's hope, for those of us in the rainy bit of the UK, we get a few more teas in the garden before the summer is out!

Donna x 


A little bit of veggie heaven

Hello! Welcome back!  I'm so glad you're here as today I want to take you down the garden path to my vegetable garden...

...through the little gate, which my Patient Other Half (POH) made for me, to keep Daisy Dog out, as she loved to gallop around on the vegetable beds when she was a puppy.


And here we are! This is looking back towards the gate:


The vegetable garden is basically a large, long triangle.  It is separate from the main garden, and hidden from the house (which helps when it isn't as tidy as it could be!)  We are fortunate to have it, as we live in a fairly new build house, but have a fairly big garden.  This piece of land was obviously a bit of a left over bit that the developers couldn't do much with, so they tacked it onto our plot, and it's marked on the deeds.  We are so thankful!

It is also on quite a slope, so my very clever POH terraced it, and built raised beds, and steps between each level.  It works brilliantly!

W used to have an allotment, but sadly lost that to development. However, POH took part of one of our greenhouses and built me a second little greenhouse, about 6 feet by 4 feet, to give me some extra indoor growing space.  We have a 6 feet x 6 feet greenhouse in the main garden, in which I raise most of our bedding plants and vegetable plants in the spring, using it for tomatoes and chillies in the summer.  The 'new' greenhouse has come into its own as a cucumber house this summer!


Cucumber 'Delizia F1'

Not having the allotment anymore has made me very creative with space saving ideas in the vegetable garden.  Runner beans grow brilliantly, scrambling across the two archways spanning the main path, and I also pinched this idea from RHS Harlow Carr - growing beans up a piece of trellis angled and tied to a couple of branches.  I grow leeks underneath!

French Beans 'Cobra' -
with a few sweet peas mixed in to aid pollination

I grow more tomatoes in hanging baskets than I do in the greenhouse.  These are a tumbling, basket variety, but I have forgotten the name!  They are exceedingly sweet and juicy, and started cropping very early.  I grew them from seed in early February.


Tumbling tomatoes in baskets

Radishes work well in hanging baskets, as long as you keep them well watered (keeps them away from the slugs too!)

Radishes in a hanging basket

One of the raised beds is really narrow, and doesn't get much sunlight.  I have found it to be an ideal watercress bed though, and we have picked so much this year, it's been brilliant!  I love the peppery taste of watercress and we eats loads of it.

The watercress bed


The courgettes got off to a very slow start this year, but are now poviding more than enough!

I think these are 'Defender' but I have forgotten,
and it's now raining,
so I won't go back and look, if you don't mind :)
Courgette 'de Nice Rond' - a round variety!

I also have two patiogro racks - one in the vegetable garden, and another outside the house doors, for easy picking of salad crops, particularly on rainy days (like today!)  I start new trays in the greenhouse, or coldframe, and once one tray is finished I  swap it over, refresh the compost in the spent one and sow something else. It works a treat!  This photo was taken in the spring:


Short rooted carrots grow well on the upper deck of the Patiogro, as it helps keep them out of reach of carrot fly.

Carrot 'Parmex'

We eat heaps of mangetout and sugar snap peas, and they grow really well, as long as you add plenty of homemade compost and/or manure to the ground beforehand, and keep picking them regularly, making sure you don't miss any pods on the plants, otherwise they think their work is done and stop cropping!


Mangetout 'Kennedy'


Talking about home made compost, I have tried various ways over the years, but find, for me, that worm composting works the best. I have four 'worm farms' and they work really hard eating all our veggie kitchen waste, newspapers, cardboard, egg shells, tea and coffee waste, non-woody prunings and clippings, and gone-to-seed vegetables. They produce the most amazingly rich, dark compost, which I spread over the vegetable beds, and the worms in the ground pull it into the soil.  I like the company Worm City the best, as their worm bins are bigger, and the extra trays make it really space efficient.  They also have lots of helpful information on getting started.  I think it's amazing how much the worms consume, and how quickly they make the compost.  I could say I'm very fond of the worms, but that would sound a bit weird...


The 'Engine Room' !


So, there you have it.  My little piece of veggie heaven.  I love, love, LOVE tripping down there every day to see what's new, as with all this rain and sun we've had, things are growing like Topsy!

One more photo left to show you.  The Little Gem lettuces..  "One missing", I hear you say??  Yes, it's for tonight's dinner... :)


Little Gem lettuce


Donna x